
Overview
Self-serve printing is available to all ECU students, faculty, staff, alumni and library guests. This page walks you through setup, printing tips and how to troubleshoot common issues.
To print at ECU you'll need a few things.
|
Requirement *
|
If you don't have it...
|
...then you will need this instead
|
| ECU OneCard |
Use your ECU credentials instead. |
Your ECU username + password. |
| ECU username * |
Follow our self-service username recovery instructions. |
Access to the personal email address you used to register at ECU (to receive automated messages). |
| ECU password * |
Create a ticket or visit Service Desk (B1116) for assistance. |
Access to the personal email address you used to register at ECU (to correspond with IT Services). Photo ID and/or student card may be required to validate your identity. |
| Print credits (e.g., Digital Wallet )* |
Learn how to add credit using our Digital Wallet guide. |
A payment method. |
| A personal laptop with our printing software installed* |
Install from here or use a shared library computer instead |
Ability to install software on your device or an available shared Library computer. |
| Access to ECU Wi-Fi (e.g., ECUAD network). |
Use your ECU credentials to join the ECUAD network + accept security certificates. |
Guests cannot use Wi-Fi to print and must use a shared Library computer instead. |
| A PDF, JPEG or TIFF image file. |
Another source file that can be converted to a supported file type. |
It is not possible to print directly from a web browser. Instead you must download the image, export a PDF of the page, and/or leverage screen shots. |
Back to top
Your ECU OneCard should work automatically at all self-serve printers on campus. If you are using it for the first time, or it doesn’t, you may need to link it to your account:
- Once linked, tap your OneCard to log in and print. You only need to associate your card once.
- You can wake the printer by tapping the black screen or tapping your OneCard on the reader (on the right side of the screen).
- If prompted, enter your MYEC credentials to link your card, press “Associate,” and a confirmation message will appear. If you encounter an error, try tapping your card again and re-entering your credentials.
Back to top
How to purchase printing
You can add printing credit to your Digital Wallet while on campus using cash, debit, credit or Apple pay.
Learn More - See our Digital Wallet guide for more information on adding funds and managing your account.
Printing pricing
| Paper Size |
Black & White |
Colour |
| Letter Size (8.5″ x 11″) |
|
55¢ per page |
|
|
|
$1.05 per page |
Back to top
How to install printing software on your computer
Students and sessional faculty can install ECU printing software on their personal laptop from the ITS website, following the instructions for their device (Mac or PC).
- Download the setup files for macOS or Windows
- Mac (ECU-issued): Install via the Software Centre in Applications.
- PC: Request Help to request installation.
Back to top
- Find a printer: Check the Campus Printer Map or the closest printer (colour, B+W, tabloid, letter)
- Send your file to any BW or Colour Laser Printer on campus
- Log in at any self-serve printer using your ECU OneCard or keyboard
- Select your file and press Print Release
Back to top
Log into print.ecuad.ca to:
- View history + balance
- Cancel queued jobs
- Request a refund (for machine errors only)
Back to top
You can request a refund if a print job failed due to a machine error.
- Go to the Recent Print Jobs tab (left menu) in your account.
- Find the job and click Request Refund on the right.
- Fill out the form with the required details and reason for your request.
Refunds are only approved for issues beyond your control. To avoid problems, always download your file and print from an appropriate app—never print directly from a browser.
Back to top
How to prepare and submit laser printer jobs from Adobe Acrobat
|

*click on the image to zoom in*
|
Step 1: Before you begin, pay close attention to the following
- the size of the pages you want to print and if you will need to scale the pages in the Print menu in order to fit it to the size of the paper you want to print on.
- the orientation of your pages; the orientation in this example is portrait.
- the number of pages in your PDF file.
Once you have proofed your PDF file and you are ready to print; go to File at the top of the window and select Print from the pop-up menu.
|

*click on the image to zoom in*
|
Step 2: Select your printer
- You are now in the Print window.
- In the Print window, start by selecting the laser printer you want to print from the pull-down menu in Printer.
- If you are printing to the "Any BW Laser Printer on Campus" select "Print in grayscale (black and white)".
- If you are printing to the "Any Colour Laser Printer on Campus" Do Not Select "Print in grayscale (black and white)".
- Once you have selected the correct printer, click the Advanced button.
|

*click on the image to zoom in*
|
Step 3: Select Colour Management options
- You are now in the Advanced Print Setup window.
- From here, select Color Management from the menu on the left side of the window.
- In the Color Handling pull-down list, select Acrobat Colour Management
- If you are printing to the "Any Colour Printer on Campus" you will want to select the "Coated FOGRA39 (ISO 12647-2:2004)" in order to get the best colours from the printer.
- * If you are printing to the "Any BW Printer on Campus" you will want to select the "Gray Gamma 2.2".
- Click the OK button located at the bottom-right of the window.
|
 |
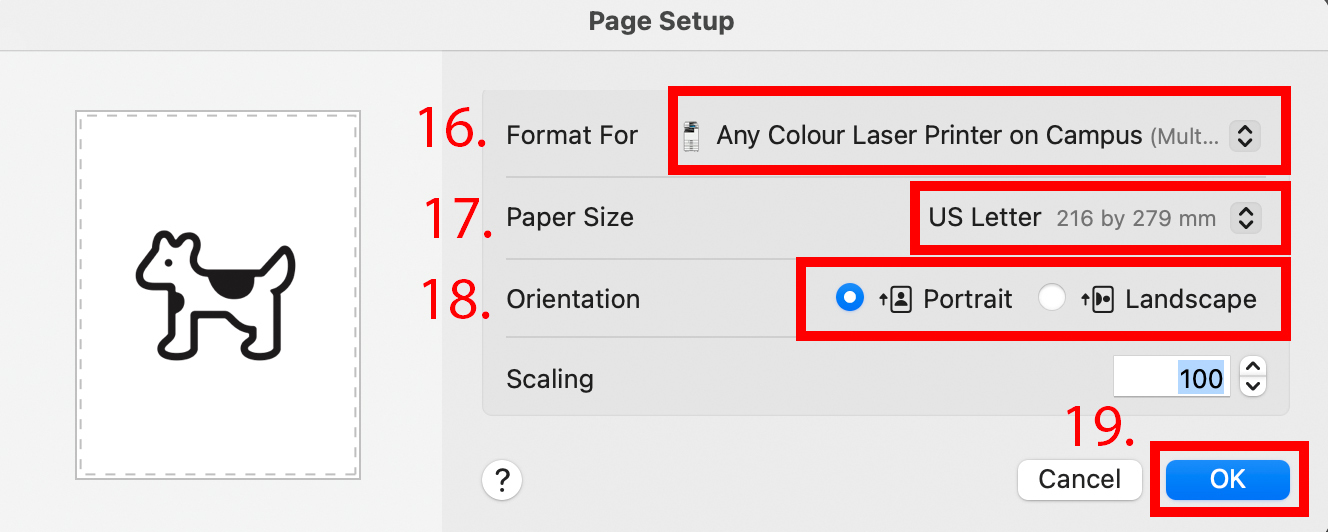
Step 4: Select Page Setup options
- You are now in the main Acrobat window.
- From the main Acrobat “Print” window, click Page Setup... located at the bottom-left of the window.
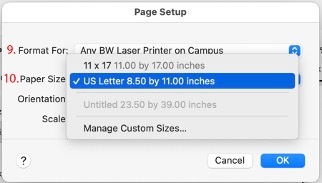
- In the Page Setup window, start by verifying that the correct printer is displayed in the Format For drop-down list. If not, select the printer you want.
- In the Paper Size drop-down list, you will have the paper sizes that are available from the printer you chose to print to. Choose one of these paper sizes to print on.
Note - Do not select Manage Custom Sizes and create a custom paper size. If you select or create a paper size that is not available in the printer you have chosen to print to, the file will not print.
- Once the Page Setup window has been properly set up, click OK to return to the Print window.
|
|
Note - Make sure "Choose paper source by PDF page size" is not selected.
Note - Flip direction is based on the edge of the paper you want to turn your printed document on.
- If you designed a document in portrait, the paper is normally “Flip on long edge.”
- If you designed a document in landscape, the paper is normally “Flip on short edge.”
- There are always exceptions but this will be the case 99% of the time
|
Step 5: Select final options and preview
- In the Print window, make sure the printer you want to print to is selected.
- In Orientation, choose Auto portrait/landscape.
- Double check that the page size displayed is the paper size you want to print to.
- If your pages are not a standard US page size, it is safest to select "Shrink oversized pages".
- Examine the preview window to ensure that it is in the correct orientation and that your page is properly displayed in it.
- If you have a multi-page document and want to print single-sided, make sure that “Print on both sides of paper” is unchecked. If you want to print on both sides of the paper, make sure that “Print on both sides of paper” is checked and you choose the correct flip direction.
- In “Pages to Print”, if there is only one page in the document, “All” will be selected. If there are multiple pages in the document, you will have to choose if you want to print “All” pages or only specific pages.
- You can choose to print multiple copies of your document but it is highly recommended that you print a single copy first and proof it for errors before paying for multiple copies.
|
 |
Step 6: Print
|
Back to top
How to prepare and submit laser printer jobs from Adobe InDesign
|

*click on the image to zoom in*
|
Step 1: Review your file
- Make sure there are “No errors.” If you have missing fonts, the printer will either not print your file or convert the missing fonts to a default system font like Times New Roman and will re-flow your text blocks.
- Go to File and Document Setup to review your document elements
- In Document Setup, check the number of pages in your document to make sure it will work for your printing intent.
- Check the page size of your document in inches and determine if you will have to scale it to fit your intended paper size.
- Is your document set up as portrait or landscape?
- Did you set up the content in any of your pages to bleed, or does every page have a white margin of at least .25 inches? If you are bleeding content on any of the pages in your document, did you set up your Bleed settings for .125” and do the components that bleed go out to the bleed margin?
- Once you have re-familiarized yourself with your document setup, click OK to return to the main window.
|

*click on the image to zoom in*
|
Step 2: Choose your printer
- You are now back in the main window.
- Now that you are ready to print, go to File at the top of the window and select Print from the drop-down list.
- Select General from the list on the left in the Print window.
- From the Printer drop-down list, choose the laser printer that you want to print with.
- Note! Each printer can only print to the size of paper that has been preloaded in it; therefore, be familiar with the paper sizes loaded in each laser printer.
- In Copies, even if you want to print multiple copies of your file, it is recommended that you print only one copy first so that you can have a printed copy to proof before committing to multiple copies.
- In Pages, set up whether you are printing All the pages in your document or a select number of pages.
- You must select whether you are printing the pages from your document as a Page (one page on aside of a piece of paper) or as Spreads (two pages side by side on one side of a piece of paper)
- Choose Print Blank Pages when you have purposefully made blank pages in your document.
- Click Page Setup to continue.
|
|
Step 3: Select Paper Size
- You are now in the Page Setup window.
- In Page Setup, re-select the printer in the Format For field from the pull-down list that you chose to print with in the Print/General menu.
- In the Paper Size pull-down list, only the papers available in the printer you are choosing to print with will be displayed. Pick the paper size that you want to print on.
- Note! If the size you want to print to is not available, you will have to choose a different printer or scale your document to fit the available paper size.
- If you are printing Pages (one page per side of a single sheet of paper), select either portrait or landscape orientation. If you created your document in portrait orientation and want to print Spreads (two pages side by side per side of a single sheet of paper), select the landscape orientation.
- Click OK to continue.
|
|
|
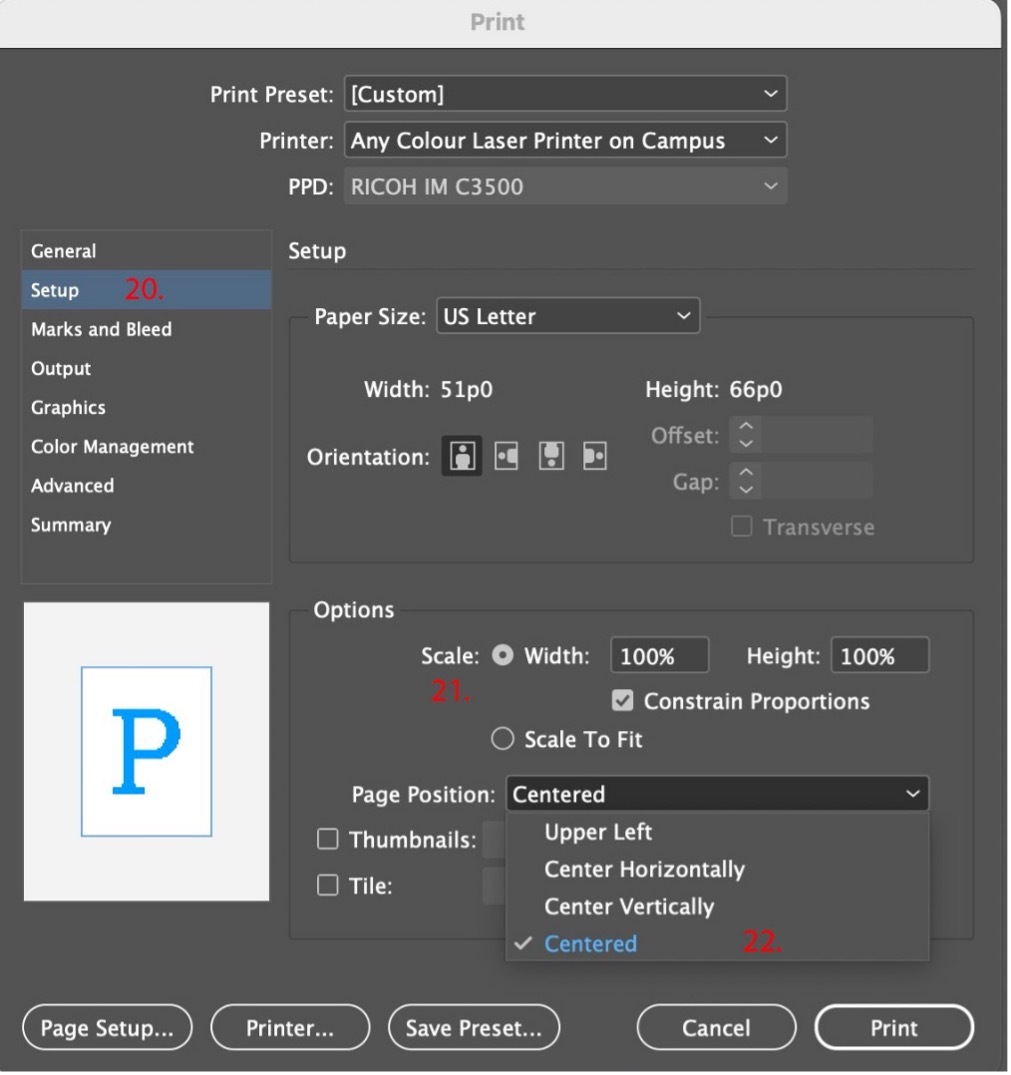
Step 4: Select print size
- You are now in the Print window.
- Select Setup from the list on the left in the Print window.
- If your document pages are smaller or the same size but with no bleed as the available paper size, set the scale to 100% in Width and Height. If your document pages are larger than the available paper size or the document page size is the same as the paper size, but you have bleed, choose Scale To Fit.
- Unless you have a good reason to select one of the other choices, always choose Centred as the method of printing your document on paper.
|
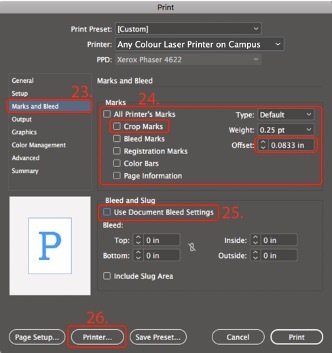 |
Step 5: Set up Marks + Bleed
- Select Marks and Bleed from the list on the left in the Print\ window.
- If your document pages are smaller or the same size as the printer paper but you set up your document with bleed, select Crop Marks and make sure Offset is set to 0.0833 inches. If your document page size is the same size as the printer paper and you have white margins on all the pages, do not select any of the Marks options.
- If you set a bleed value in Document Setup when you created your document originally, select Use Document Bleed Settings. If you did not set up a bleed value in Document Setup when you created your document originally but you did design your document with proper bleeding, choosingUse Document Bleed Settings will have no effect, you should instead deselect Use Document BleedSettings and enter the bleed value of .125 inches manually for all for sides.
- Click Printer to continue.
|
|
|
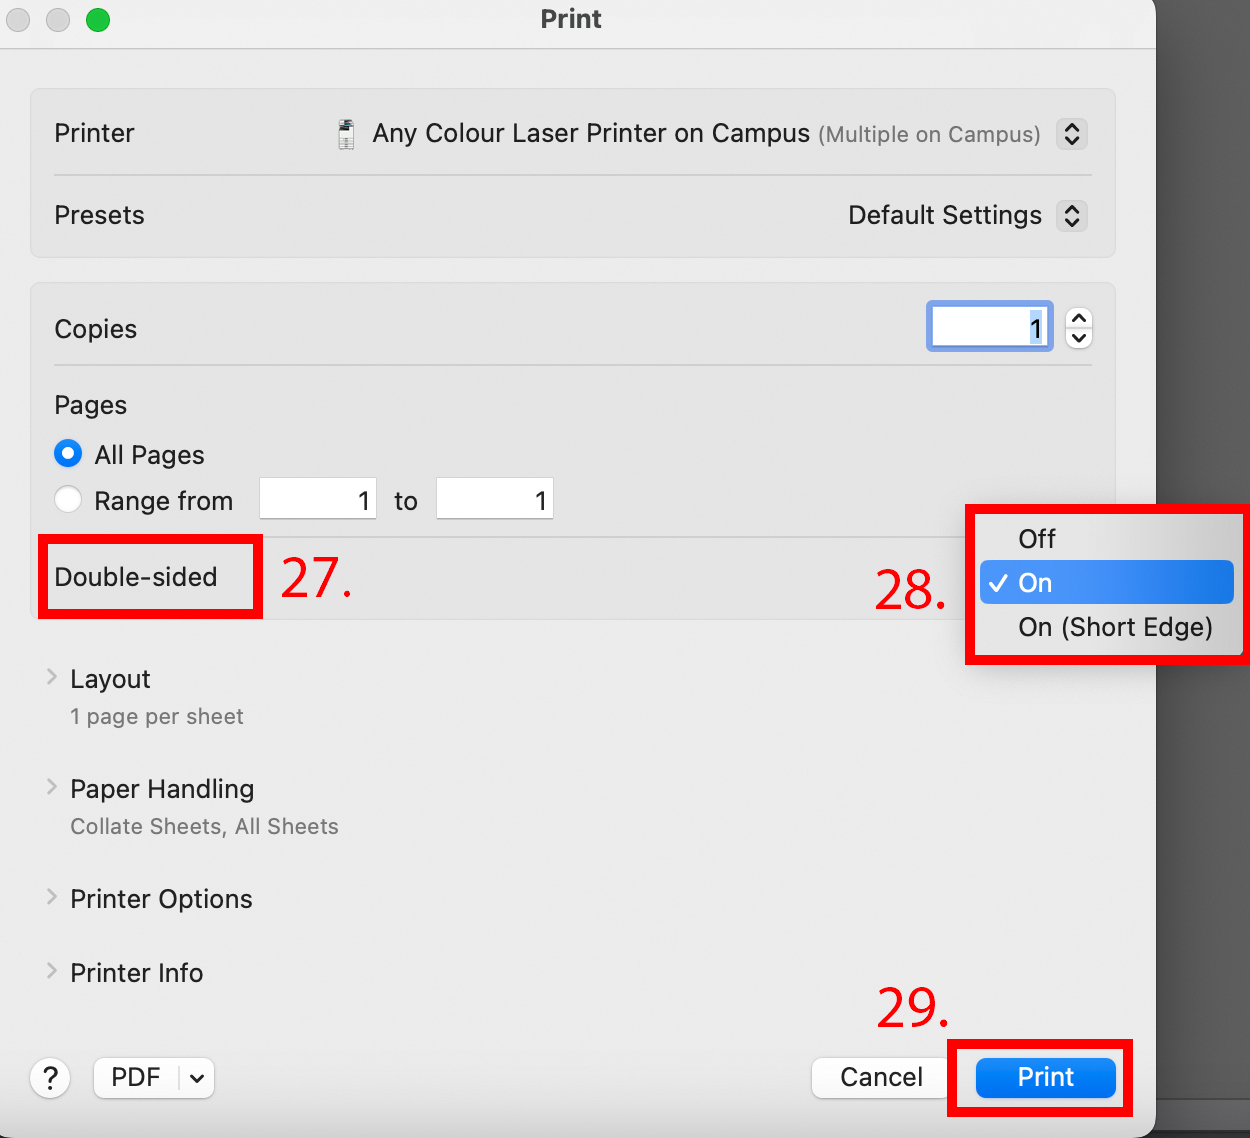
Step 6: Select 1 or 2 Sided Printing
- If your project is double sided click where it says Double-Sided.
- Next, select "On" if your pages flip on the Long-Edge or "On (Short-Edge)" if your pages flip on the Short-Edge.
- Click Print to continue
|

*click on the image to zoom in*
|
Step 7: Select Colour Matching
- Click on the Color Management menu on the left of the Print window.
- In the Color Handling menu, select "Let InDesign Determine Colors."
- Next in Printer Profile: select "Coated FOGRA39 (ISO 12647-2:2004."
- If you are printing to the "Any BW Printer on Campus," you will want to select the "Gray Gamma 2.2".
- Click Print to send the file to the print queue.
|
|
Step 8: Print
|
Back to top
How to prepare and submit inkjet printer jobs from Adobe Acrobat
Back to top
How to prepare and submit inkjet printer jobs from Adobe Photoshop
Back to top
How to prepare and submit booklet printing jobs from Adobe Acrobat (PDF)
How to prepare and submit booklet printing jobs from Adobe InDesign
Back to top
The new printers also act as scanners! You will be able to scan something for free, and send it directly to your ECU email.
- Log in to the touch screen by tapping your ECU OneCard on the card reader
- Select Scan
- Press Start Scanning, or press Settings to change options and then press Start Scanning
- Press Log out when you are done!
Back to top
There is now colour, black and white, letter, and tabloid laser printing on every level of the building.
Take a look at this Campus Printer Map to find a printer near you.
Back to top
OS Compatibility + Known Issues
- iOS18.5 supports printing from both the mobile Acrobat app and from Photos.
- iOS 17.4.1, we have successfully printed images from "Photos" through both the "Print BW" and the "Print Colour" print queues.
- Currently, you will need to authenticate every time you print an image from your mobile device.
- You still can print from your Apple mobile devices when running iOS 16.x.x, but please do not try printing images (jpeg, Tiff, PNG, etc.) if you are on iOS 17.0.0 to 17.4.0.
- Do not try printing from the new OS 15 to 15.01 it is problematic.
- If you are going to update your laptop to Sequoia OS 15, please make sure you are updating to at least OS 15.1
- As an alternative, you can airdrop your files to a desktop Mac computer.
Back to top